In my attempt to put a dent in my painting schedule i've managed to get a Phoenix Mirmadon painted to the point where i can show you a few pictures. This warjack was painted much like the Griffon using the same spray paint technique to achieve the white armour. I'm happy with how it has turned out so far.
Monday, July 26, 2010
Sunday, July 25, 2010
Amassing the Retribution
Yes it's time to owe up to the large amount of unpainted miniatures i have staring me in the face and give them a decent coat of paint. The process always seems to be more consuming that it originally does at the offset, however i try not to let that deter me when putting the brush to plastic (or metal or resin whatever it may be).
I'm trying out a new painting technique on the Mirmidons in my Retribution of Scyrah force for Warmachine to try and speed along the painting process a little. To start with i've given the model a prime of black at which point i coated the entire model's accessible points with Astropath Grey and set it aside to let it dry. After the model had ample time to make sure all the paint was dry i sprayed the model sparingly with white spray paint from the angle of the light source. After that the model had a good base colour with shading to work with, I then sealed the model with a spray of matte varnish and touched up some of the details where the white was too strong or not strong enough.
The rest of the model was painted much in the same way i would paint the Mirmidons normally, just this time with the white armour of the model completed in a fraction of the time it would normally take.
This method is not fool proof and the convenience of this method does show on the finished product. Although the model is not 100% complete, i'll post some pics to see what you think of the zenith spray technique and its results.
And here's a pic of a very sad and mostly unpainted warmachine army looking back at me.
Thats 1 heavy Mirmidon, 2 light Mirmidons, 11 Mage hunters, 12 Invictors, an Assassin, 2 Snipers, A Soulless Unit Attachment, an Arcanist, 4 Archers, Rayvn, Garryth, and Narn
Friday, July 23, 2010
WIP Plagueclaw Catapult Paintjob
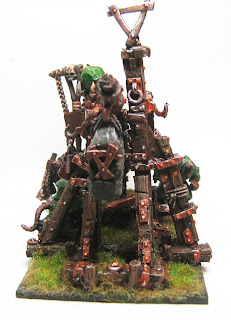
Here's a few pictures to show you how the plagueclaw is coming along, now with a few coats of pain and nearly finished and ready for the tabletop. A few things are left to remain such as some more work on the plaguemonk crew, and the "standard" as well as a few miscellaneous details that need touching up here and there. I decided to go with the orange rust instead of verdigris to go along with the theme throughout the army, it also adds a little more colour where there are plenty of greens and greeny blues already involved in this piece. Enjoy!
Wednesday, July 21, 2010
Pre-Heresy Deathguard Plague Marine
To break up the repetition of painting so many rats over the past while (yes there are more on the way, pictures coming soon), I decided to work a little more on the deathguard army after a inspiration hit to paint Plague Marines that still retained a semblance of their former legion colours. Of course the armour would be caked in dust and filth, but under all that i wanted there to be a connection to the days when they were once among the emperor's finest. Here is the result!
This model is from the Havok Plague Marine boxed set, which i believe is currently unavailable, although i'm not 100% sure on that one. The base colours used on the model were Astronomicon Grey and Knarloc Green, and an assortment of various browns, oranges, greens and yellows. If there is any interest I'll post a tutorial on how to achieve this look relatively simply, believe me it's a great deal easier than you think!
This model is from the Havok Plague Marine boxed set, which i believe is currently unavailable, although i'm not 100% sure on that one. The base colours used on the model were Astronomicon Grey and Knarloc Green, and an assortment of various browns, oranges, greens and yellows. If there is any interest I'll post a tutorial on how to achieve this look relatively simply, believe me it's a great deal easier than you think!
Monday, July 19, 2010
Scratch Built Treekin Model
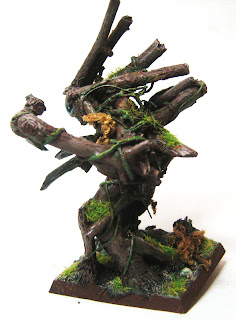
After some work i've managed to piece it together, a rather large and natural looking Treekin model. The majority of this model is actually made with twigs and dead pieces of wood i gathered, all super glued together, with a sculpted face and details made of "green stuff", and talons made of plastic roughly cut with an exacto blade. Spanish moss, slate and various sizes of sand and gravel were added to make the base and model feel more overgrown. Here's some pictures!
The model was spray varnished to seal the wood and vine pieces. 5 more to go :) !
The model was spray varnished to seal the wood and vine pieces. 5 more to go :) !
Sunday, July 18, 2010
Plagueclaw Catapult Conversion
The conversion was inspired heavily by another conversion that was found on the internet using the Orc and Goblin's Rock Lobba model as a basis and an assortment of pieces from the Screaming Bell and Plague Monk kits. Here' how it turned out.
This was a relatively simple and effective way i find to make a plague claw catapult using some spare bits and a the rock lobba model. Please feel free to leave any questions or comments.
This was a relatively simple and effective way i find to make a plague claw catapult using some spare bits and a the rock lobba model. Please feel free to leave any questions or comments.
Subscribe to:
Posts (Atom)


