Thursday, April 29, 2010

Deathwing Terminator Painting Tutorial

Step One: After Cleaning and assembling the model I’ve given it a thorough priming with a bone coloured primer. If you don’t have a can of bone coloured primer handy you can achieve the same coverage by using an air brush, or simply prime the model white and then with a large brush paint over the entire model with bleached bone. I’ve made sure to prime the model with several coats consisting of short controlled bursts on all sides, this allows for greater coverage and a smoother finish. Two thin coats of primer should be adequate, just make sure to allow each coat to completely dry before applying the next.

Step Two: Glaze the entire model with Griphonne Sepia Wash. Make sure that your brush isn’t overloaded with the wash to prevent pooling, to do this simply run the brush along the lip of the paint pot to be rid of any excess. This may take some trial and error to get the correct amount of wash on your brush, but have patience.


Step 3: With a large brush (I used the basecoat brush) clean up the model, and pick out the raised areas with bleached bone. I also highlighted with broad lines around the edges of the shoulder pads and the tops of the knee pads/grieves. In this step these general highlights will determine the general locations of further highlights.


Step 4: Paint any areas of the model that are to be black, grey or nmm with fenris grey. This will serve as a colour guide for the model and a general base coat for these areas. If you get any grey paint on the adjacent bone coloured areas don’t worry you can go over any touch up areas with bleached bone after you’re done painting the grey.

Step 5: Pick out the other coloured areas with dark angels green and blood red. If you dilute the paints approx. 1 part paint to 1 part water you can use the paint similarly to a more concentrated wash. The paint should not run but be pushed into the crevices with controlled flow from your brush. If done this way the bone colour beneath should be ample enough to provide highlights without applying further colour.

Step 6: Apply a wash of Badab Black to all areas that were previously coloured grey. Remember to control the flow to keep the black wash from running onto other areas of the model. Use a fine detail brush to apply the black wash to smaller less accessible areas on the model.

Step 7: With a fine detail brush pick out the raised edges of the bone armour with a 50/50 mix of bleached bone and skull white. Thin your paint slightly with water to allow the paint to flow off the brush in smooth narrow lines. This can be done easily by running the side of the brush along the hard edges of the model.

Step 8: For these models I’ve decided to go with a glowing eye effect. To do this, first paint the eye and the surrounding area in Swooping hawk turquoise with a little bit of white added to the mix (in my opinion the paint is too dark right out of the pot), apply this in a watered down layer so to glaze the area surrounding the eye reather than painting it. Going in towards the center of the eye highlight with increasing amounts of white paint added to the mix followed by a pure white dot in the very center of the eye.

Step 9: Using a 2:1 mix of white and bleached bone, paint the most extreme highlights on the model. Remember to thin your paint to allow for good flow off your brush to achive the sharpest highlights. After this pick out light source points with a dot of pure white at the center of each highlight.

Step 10: Highlight the Grey, Black and NMM areas with shadow grey, 1:1 Shadow grey and Space wolves grey, Space wolves grey, and finally 1:1 Space wolves grey and Skull white. The most extreme highlights can be picked out with a dot of white paint in a similar fashion to the bone coloured armour.

And there you have it, 10 steps to painting your own Death Wing terminators. Below are some pictures of the completed model.


Wednesday, April 28, 2010

Carried Away on Darkened Wings

So tonight, i'm jumping back to the Dark Angels models for a quick breather from painting pink power armour and switching it out for dark green power armour. I'm really happy how this model turned out, I opted not to use metallic paints as i thought the model was going to be amply dark without them, so i switched out the mythril and boltgun metal for some NMM (Non-Metallic, Metallics). I started with a fenris grey base and then worked my way up the highlights by adding small amounts of white to the mix, i think i used 2 highlights in total with some pure white after the fact to show light source and shading with some bedab black wash. If you keep a small amount of wash on your brush you can actually control the pigment to go where you want, using it as a glaze.

The green power armour was painted with a base of dark angels green then highlighted with snot green/darkangels green mix, then washed with Thraka Green, Shaded with Bedab Black, highlighted again with Snot green working up the light sources with increasing amounts of bleached bone added to the mix, followed by a few dots of pure bleached bone to show light source.

The Robes are based with khemri brown, followed by a fairly heavy coat of dheneb stone, leaving only the deepest recesses. The robes were then glazed with griffonne sepia, paying additional attention to the deeper folds in the cloth. The rope and highlights were then picked out with bleached bone.

The skin on the face is a mash of too many colours, i'm not sure i've found the exact tones i'm happy with yet for the skin.

Tuesday, April 27, 2010

When Green turns to Pink

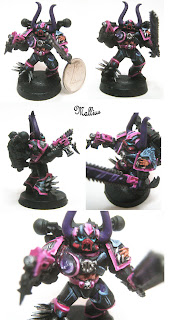
After a great deal of anticipation while waiting for the greens to dry from my previous post, I'm finally able to lay into the models with some paint. I'm a huge fan of this particular model because of the epic pose it's in, even further accentuated with the lengthened torso and other adornments. So heres what the finished product looks like (or finished until i can find something left to paint on it). The paint scheme is similar to the test scheme, large black areas with pink trim and purple accents. I'm looking forward to seeing how some of my more "bizarre" creations will turn out after a good coat of paint. I'll post some more greens in a couple days once the sculpts are finished.

Once again though i'm left to come up with a basing scheme for these models, i'm not quite sure what would work with these guys.

Sunday, April 25, 2010

Emperor's Children Paint Test

So i primed the first of the Emperors Children Noise Marine Models as i'm currently waiting for the epoxy on the others to cure. This model has some of the features of the other two that i posted earlier, with the addition of a rather large and spiky boot that i'm rather fond of. Also worth noting, this is the first mini I've painted using my new wet pallet, it's great! So the paint scheme is predominantly black with pink trim and purple accents, i want to keep the colour pallet relatively limited staying away from any of the warmer colours. So below is a collection of Work in progress shots so you can see the general scheme.

Emperors Children Sculpts

Today i have a few greens together of some converted emperors children noise marines, based on the chaos space marine model. As there isn't a standard noisemarine model other than the sonic weaponry, one torso, a backpack and a few heads i've decided to sculpt on additional details as seen in some of the slaanesh art work. I've added talbards, sections of exposed skin the hermaphroditic breast, leather armour coverings and speakers onto the models, all being very symbolic of the legion.

The most involving bit of this process had to be the resculpting of the abdominal area. To do this the model had to be separated at the waist, hollowed out with a grinder, and finally re-pinned in place to allow for ample sculpting space. Overall i find the effect to be quite striking and i'm looking forward to painting up these devious minis.

Friday, April 23, 2010

Terra Firma

Here's a quick update from the model i posted earlier this morning, after some debate I've finally decided on a basing style for the dark angels. The proportion of large bases will allow for some creative basing that can really be showcased throughout the army.

The concept here is broken overgrown asphalt, i may add further debris in the future, but for now it's a very "nature overtaking society" look, with the nice greens protruding from the greys and blacks. The chunks of asphalt are made of pieces of ripped cork board, which you can find at most craft stores. I've had this stuff hanging around for awhile so i've finally decided to use it.

Gravel and sand is then applied to even out the texture of the base, followed by a relatively limited palate of colours.

Finally GW Static Grass and Woodland Scenics Tall grass was then applied to represent the vegetation growing between the cracks.

Other possible additions to the bases could include oil spills, water, and spent shell casings.

We are but Ghosts, Dead Men Walking

After a longer than usual hiatus from miniature painting, I have a new prototype paintjob of a Deathwing Terminator to go along with my Dark Angels Spacemarines Army. I was fortunate enough to have a bone coloured spray paint,which is close enough to the citadel "bleached bone" pigment, to get the base colour down on the model. The spray paint was provided by Army Painter, and is applied to the model much like a standard citadel primer would be and dries with a consistent matt finish. I have painted several Deathwing terminators in the past without the use of this spray colour. The process was time consuming and resulted in a paint job i was not all together happy with. I'm going to take this as an opportunity to re-prime and re-paint my 20 terminator models. When they are finished they should stand in striking contrast to their Ravenwing counterpart.

Highlights of this paintjob, where to begin. The eyes and the lightning claws are painted in a similar fashion all be it reverse from one another, the eyes starting from the darkest hue and working up to the brilliant white dot at the center of the eye, The claws started with a solid coat of off white and were then successively shaded with blended washed of turquoise and enchanted blue right at the base of the claw, which was feathered into the remaining turquoise paint. The emblem on the right shoulderpad is a free handed painting of the Deathwing iconography, painted in a single coat of blood red. A pencil outline was drawn on the model for reference before the symbol was painted and then later erased after the paint had dried to ensure it was scaled to the size i wanted it before i painted it on. This is very helpful especially when using temperamental colours such as whites and reds. Shading was done with Griphonne Sepia, Delvin Mud and Badab Black Washes. the weathering was done by selectively painting a dark brown paint to scratched areas, then highlighting the underside with either white or bone coloured paint.

I have not decided how best to do the bases for these models, although i'm thinking of using cork and sand to achive a disturbed earth feel, Another idea was to do a arid wasteland base with bone coloured tall grass, savanna style. A darker coloured base might compliment these models better, elements of green would also tie into the green aquilla symbol on the chests of the models. How about you leave me a comment and tell me how you think i should base this model.